Bulk email verification: the complete walkthrough
Got a list of hundreds — or hundreds of thousands — of email addresses to verify? Single verification is not the right tool. You want bulk.
Bulk lets you upload an entire list and verify every address in one job. Whether you have 50 contacts or a million, the bulk pipeline processes the whole list and gives you per-address results when it is done. This guide walks you through every path: file upload, paste, and direct platform connection.
Three ways to verify in bulk
| Method | Best for |
|---|---|
| Upload a file | CSV or TXT files from your computer (the most common path) |
| Paste emails | Quick verification of a handful of addresses pulled from a spreadsheet or thread |
| Connect a platform | Direct import from your existing email tool (Mailchimp, HubSpot, Klaviyo, and 14 others) |
Pick whichever fits the workflow. The next sections walk through each path step by step.
Method 1: upload a file
This is the path most people use. If your list lives in a spreadsheet, export it as CSV and upload.
Step 1 — open Bulk Upload
Click Bulk Upload in the left sidebar of the dashboard.
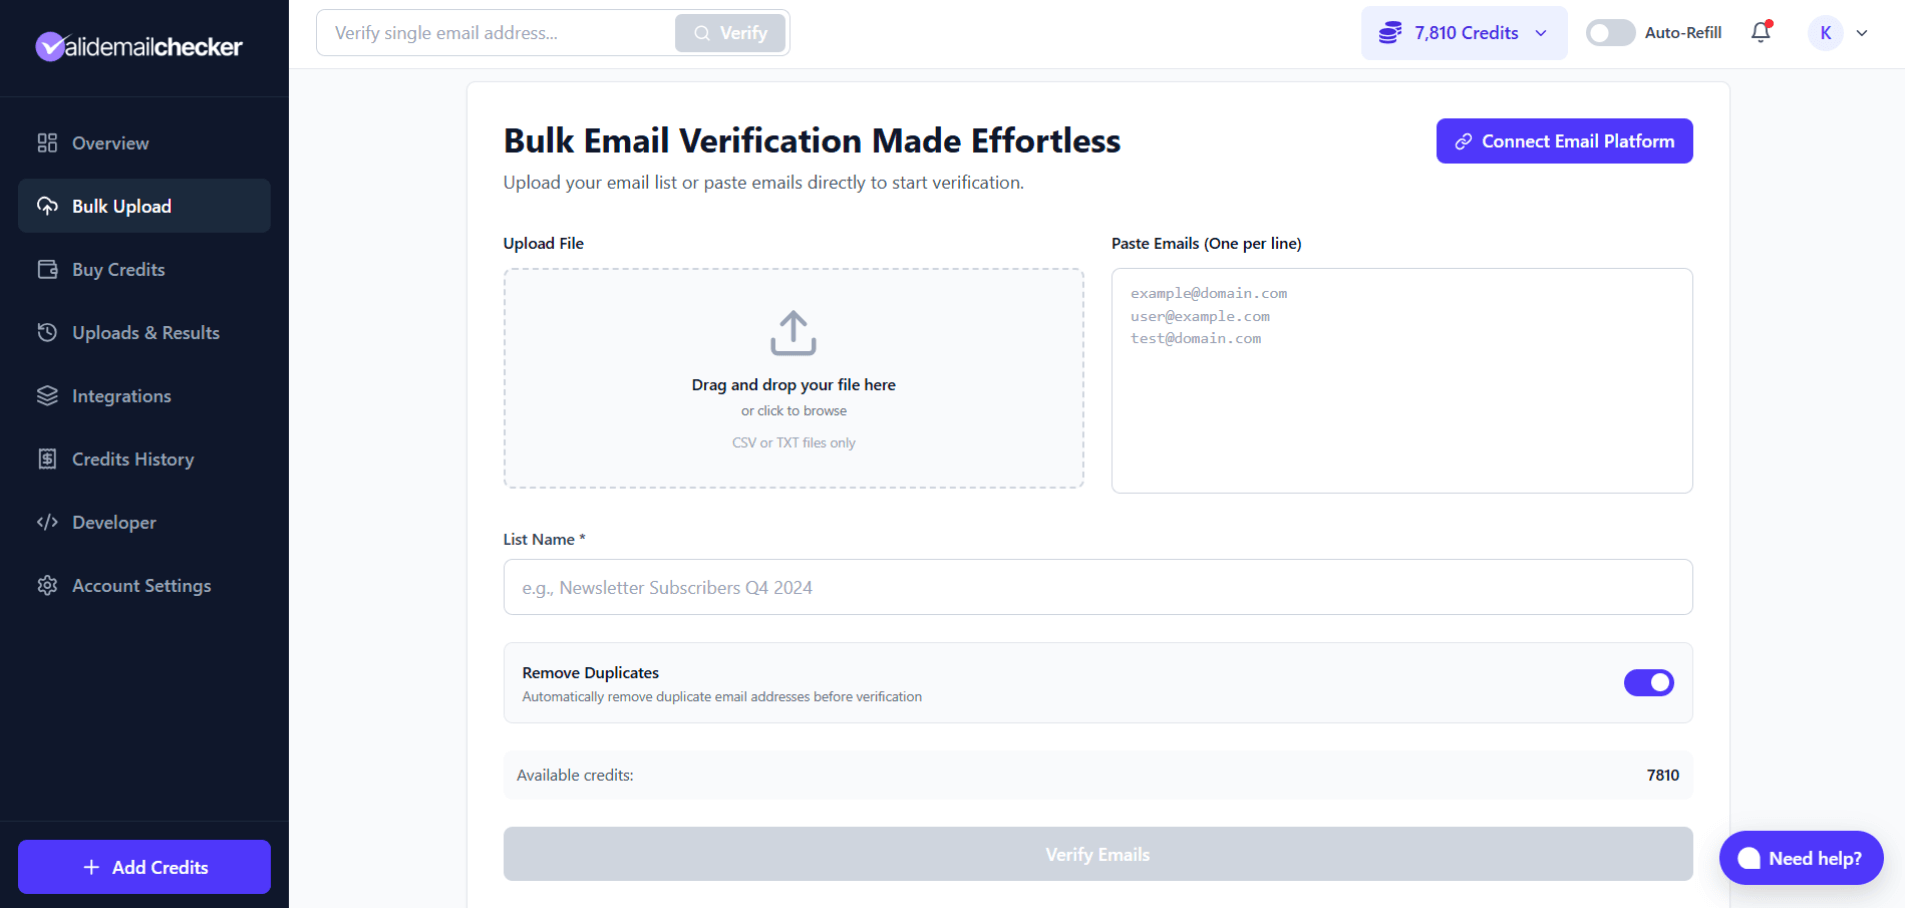
Step 2 — drop or browse to your file
- Drag and drop your file into the upload zone, or
- Click the zone to open a file browser and pick the file manually.
Step 3 — name the list
Once the file lands, the List Name field auto-populates with the filename. You can replace it with anything more useful:
Newsletter Subscribers Q1 2026Trade Show Leads — ChicagoCustomer Database Cleanup
A clear name pays off later when you have a dozen jobs to scroll through on the results page.
Step 4 — keep "Remove Duplicates" on (recommended)
The Remove Duplicates toggle is enabled by default. Leaving it on does three things:
- Saves credits. You only pay for unique addresses.
- Speeds up the job. A smaller list finishes sooner.
- Cleans your output. No repeated rows in the results file.
With the toggle on, duplicates are stripped before verification starts. A banner shows how many were removed.
Step 5 — confirm credit balance
The Available credits total sits at the bottom of the form. Confirm you have enough for the list size. If not, click + Add Credits in the sidebar before kicking off the job.
Step 6 — click Verify Emails
Hit the Verify Emails button. You'll be redirected to the Uploads & Results page where you can watch the job run.
Method 2: paste emails directly
No file? Paste straight into the dashboard.
- Open Bulk Upload.
- Find the Paste Emails (one per line) text area on the right.
- Paste your addresses, one per line.
- Enter a list name.
- Click Verify Emails.
john@example.com
sarah@company.org
mike@business.net
support@startup.ioThis is the right path when you want to spot-check a handful of addresses, grab some from a thread, or test the service before committing a real file.
Method 3: connect your email platform
Why download a list just to upload it again? If your contacts already live in Mailchimp or HubSpot, pull them directly.
Click Connect Email Platform on the bulk upload page to see the integrations modal.
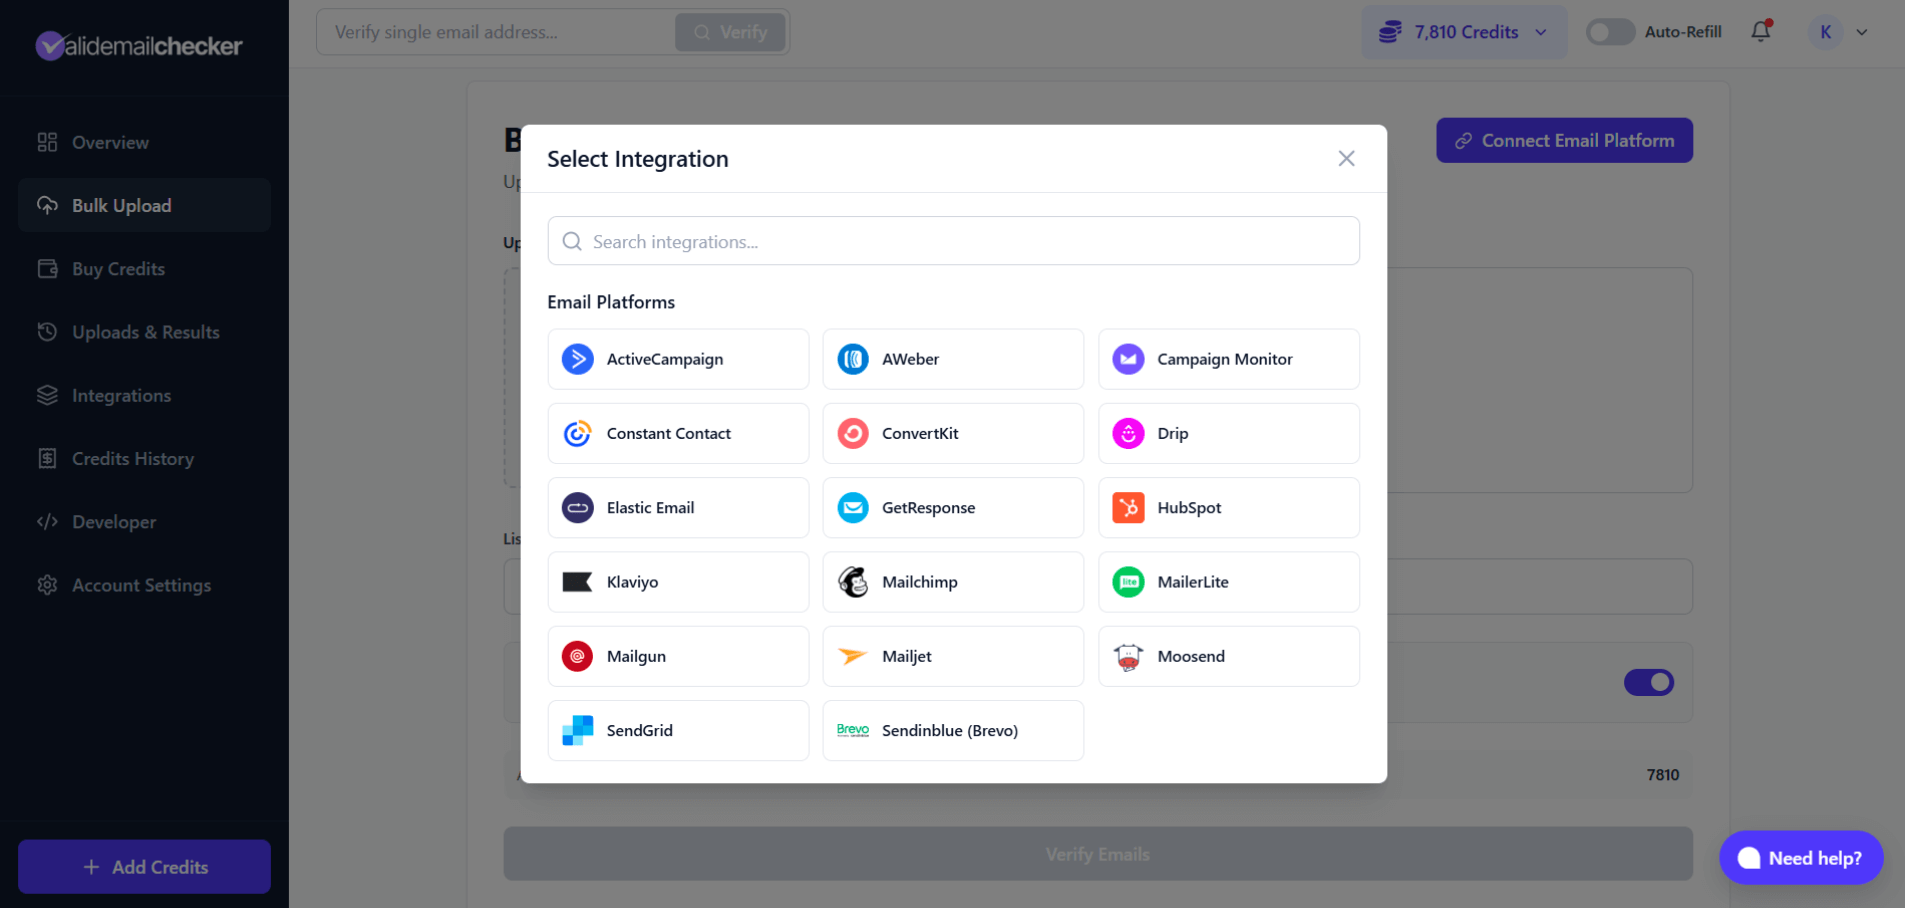
Available platforms (17 total)
| Platform | Platform | Platform |
|---|---|---|
| ActiveCampaign | AWeber | Brevo (formerly Sendinblue) |
| Campaign Monitor | Constant Contact | ConvertKit |
| Drip | Elastic Email | GetResponse |
| HubSpot | Klaviyo | Mailchimp |
| MailerLite | Mailgun | Mailjet |
| Moosend | SendGrid |
How platform integration works
- Click Connect Email Platform.
- Pick your platform from the modal.
- Authorize the connection (one-time OAuth or API key).
- Choose which list or segment to verify.
- Results sync back to your platform automatically.
This is the cleanest path for ongoing list hygiene — no manual export, no re-import, no version-of-the-list confusion. See our integration overview for setup steps per platform.
Watching your job run
After you click Verify Emails, you land on Uploads & Results. The progress bar updates in real time — no need to refresh.
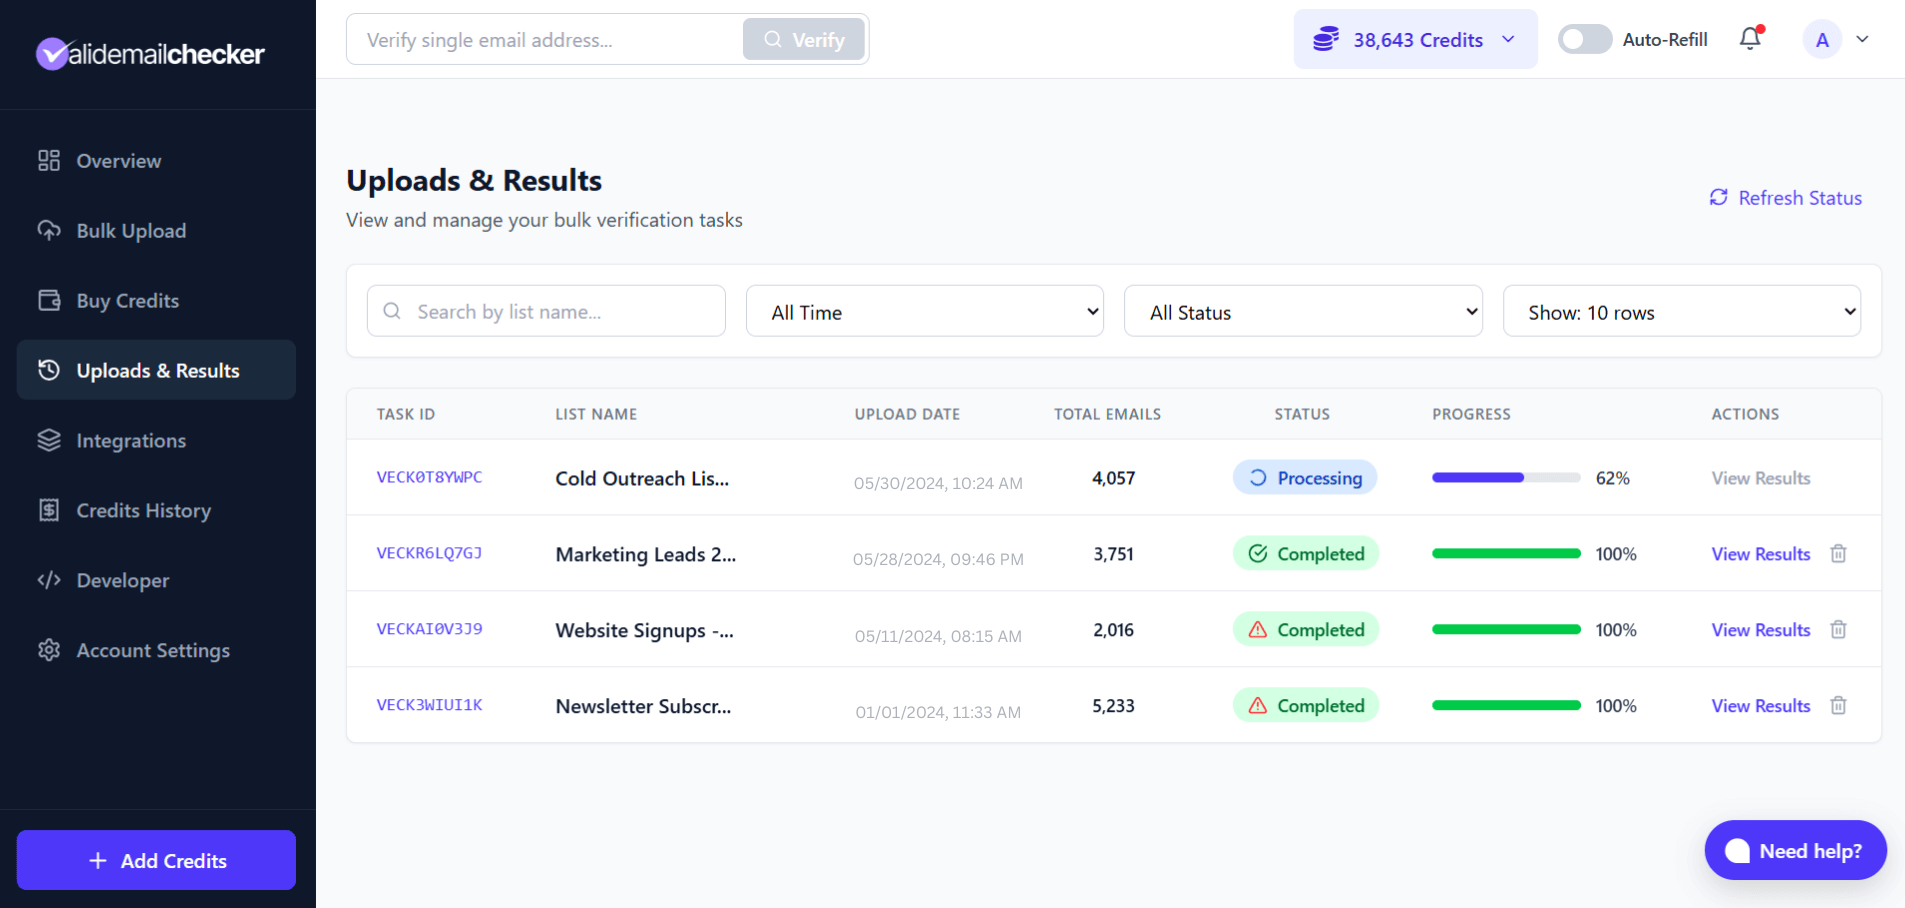
What you see
| Column | What it shows |
|---|---|
| Task ID | Unique identifier for the job |
| List Name | The name you gave the upload |
| Upload Date | When the job started |
| Total Emails | How many addresses are in the job |
| Status | Processing, Completed, Completed with Warning, Failed, or Deleted |
| Progress | Visual progress bar with percentage |
| Actions | View Results, Delete |
Status indicators
- Processing — verification in progress, percentage shown.
- Completed — finished cleanly. Click View Results.
- Completed with Warning — finished, but some servers were unreachable. More on this below.
- Failed — something went wrong (rare, usually a connectivity hiccup).
- Deleted — data removed after the 15-day retention window.
What "Completed with Warning" means
Sometimes a job finishes with a small warning badge. This is not bad news. Here is what happened.
We verified everything we could reach. Some mail servers, though, did not respond — maybe they were under maintenance, throttling, or just timing out. Instead of marking those as unknown and charging you for the privilege, the system does three things.
- Verifies what it can. Every responsive server gets a normal verification result.
- Splits out the rest. Unreachable addresses go into a separate downloadable file.
- Refunds the credits. Every unprocessed address is auto-refunded — no support ticket required.
How long does it take?
| List size | Typical time |
|---|---|
| Under 100 emails | Seconds |
| 1,000 emails | 1–2 minutes |
| 10,000 emails | 5–10 minutes |
| 100,000 emails | 15–30 minutes |
| 1,000,000 emails | 1–2 hours |
Some servers respond fast. Others greylist intentionally to slow down verifiers. We wait rather than rushing, because rushing means worse results. You can close the browser tab — the job keeps running.
How your data is handled
If your upload has extra columns (first name, company, notes, custom IDs), they stay. We append verification columns to the right — we never delete or reorder yours.
Original file:
email,first_name,company
john@acme.com,John,Acme Inc
sarah@corp.net,Sarah,Corp LLC
Results file:
email,first_name,company,Status,Score,Domain,Safe to Send,...
john@acme.com,John,Acme Inc,safe,98,acme.com,Yes,...
sarah@corp.net,Sarah,Corp LLC,invalid,3,corp.net,No,...
No header row? The system auto-detects the email column and labels the rest Column2, Column3, etc. The email column itself is always relabeled Email for clarity.
Credits and billing for bulk
- 1 email = 1 credit. Same rate as single verification.
- Duplicates removed before charging (when the toggle is on).
- Unknown results auto-refunded at the end of the job.
| Scenario | Credits charged |
|---|---|
| Upload 1,000 emails, zero duplicates | 1,000 |
| Upload 1,000 emails, 100 duplicates removed | 900 |
| Upload 1,000 emails, 50 come back Unknown | 950 (50 auto-refunded) |
Filtering and managing your jobs
On the Uploads & Results page, three filters help when you have lots of jobs:
- Search bar — filter by list name.
- Time filter — all time, last 7 days, last 30 days, or a custom range.
- Status filter — Processing, Completed, Completed with Warning, Failed, Deleted.
- Rows per page — 10, 25, 50, 100.
Deleting your data
Every completed job has a trash icon in the Actions column. Click it to permanently delete the verification.
- The results file is removed from our servers.
- The data cannot be recovered after deletion.
- Credits are not refunded (the verification already ran).
File preparation tips
- Strip obvious junk first. Test rows, placeholder emails — delete them before upload so you do not waste credits.
- Check column structure. Mixed formats in the email column cause detection issues.
- Save as UTF-8. Accents and non-Latin characters survive the round-trip cleanly.
- Keep files under 100 MB and 1M rows. Split larger lists.
Common issues
| Problem | Fix |
|---|---|
| "Invalid file format" | Confirm the file is .csv or .txt, not .xlsx. Export to CSV. |
| Emails not detected | Make sure they live in a clean, consistent column. |
| Weird characters in results | Re-save the original as UTF-8. |
| Job stuck for a long time | Large files take time. Check back in 15–30 minutes before assuming something is wrong. |
Single vs. bulk: when to use each
| Use bulk when… | Use single when… |
|---|---|
| Cleaning a list | Checking one prospect |
| Importing contacts to a CRM | Verifying before sending an important email |
| Regular list maintenance | Testing the service |
| Processing form submissions in batches | Quick one-off check |
| More than ~10 emails | Fewer than ~10 emails |
After your job finishes
- Download the cleaned file with all verification columns.
- Filter by status to separate safe addresses from risky ones.
- Drop invalid, disposable, and spam-trap rows.
- Re-import the clean list into your email platform.
- Send.
Next steps
Related questions
Still stuck? Email support